Despiking Data
Spikes in data can be caused by environmental debris in the water column (phytoplankton, jelly fish, etc.). Regions of high biological productivity are more likely to result in lots of spikes in your data set. Such spikes can change the spectra and skew estimates of dissipation. Despiking detects anomalous, stand alone spikes in data and replaces the spikes and adjoining data points with a carefully constructed average.
The despike function in the ODAS Matlab Library performs the following steps:
- The local standard deviation is calculated by a high-pass filtering the input signal, rectifying it, and smoothing it with a low-pass zero-phase filter.
- The despike function identifies spikes in the time-domain by comparing the instantaneous rectified signal against a local standard deviation; if the instantaneous signal is above a certain threshold, it is identified as a spike.
- The spike and adjoining points are replace by a carefully constructed average.
Steps (1) – (3) are repeated, using the signal produced in step (3) as the input signal for the subsequent iteration of step (1) until no further spikes are identified. This process can be visualized using the ‘-debug’ option of the despike function.
Call the despike function using the command
>> despike(dv, thresh, smooth, Fs, N, ‘-debug’)
where dv is the signal to be despiked, thresh is the threshold value for identifying spikes (quick_look uses a default of 8), smooth is the cut-off frequency of the first order Butterworth filter that is used to smooth the rectified input signal (quick_look uses a default of 50 Hz), Fs is the sampling rate (our instruments usually sample at 512 Hz), and N is the number of spikes removed (quick_look uses a default of N = 0.04*Fs). The spike and adjoining points are replaced by a carefully constructed average. The number of replaced adjoining points is a controllable parameter. If an insufficient number of data points are replaced, spike artifacts will remain in the data and continue to skew the dissipation estimates. If too much data is replaced, the signal variance will be reduced. Effective despiking requires scientific judgement and careful control of despiking parameters to achieve the ideal balance. Appropriately despiked data produces cleaner spectra and more accurate dissipation estimates.
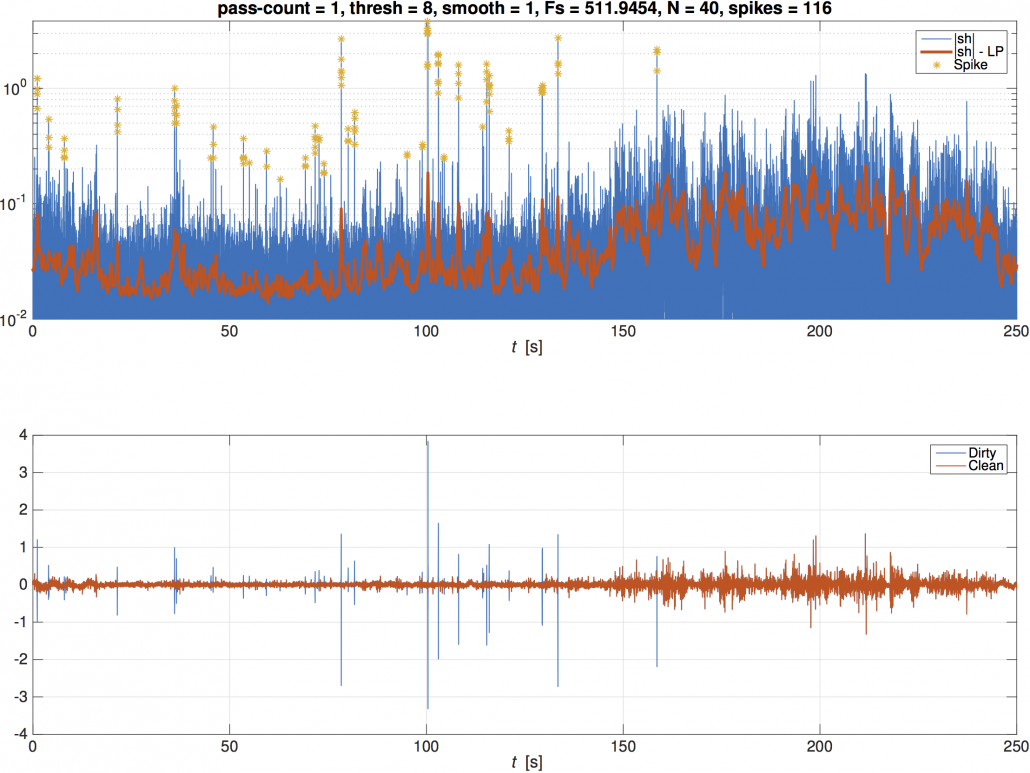
The ‘-debug’ option produces a figure with 2 plots to visualize the despiking processing. The smoothed, rectified data (red) and the instantaneous rectified data (blue) from the first pass of the despiking routine are plotted with identified spikes indicated with a yellow star (top plot). The input signal (blue) and the despiked signal (red) are also plotted (bottom plot). Press any key to move the despiking routine forward to the next pass of the despiking routine. The plots will update to include the despiked signal from the previous iteration being used as the smoothed, rectified signal for the current iteration. The input signal in the lower plot will remain the original input signal.
Use the ‘-debug’ option to test different thresh, smooth, and N parameters. Once you are satisfied with the despiking, the parameters can be input into quick_look to perform the despiking for you.